 Breakfast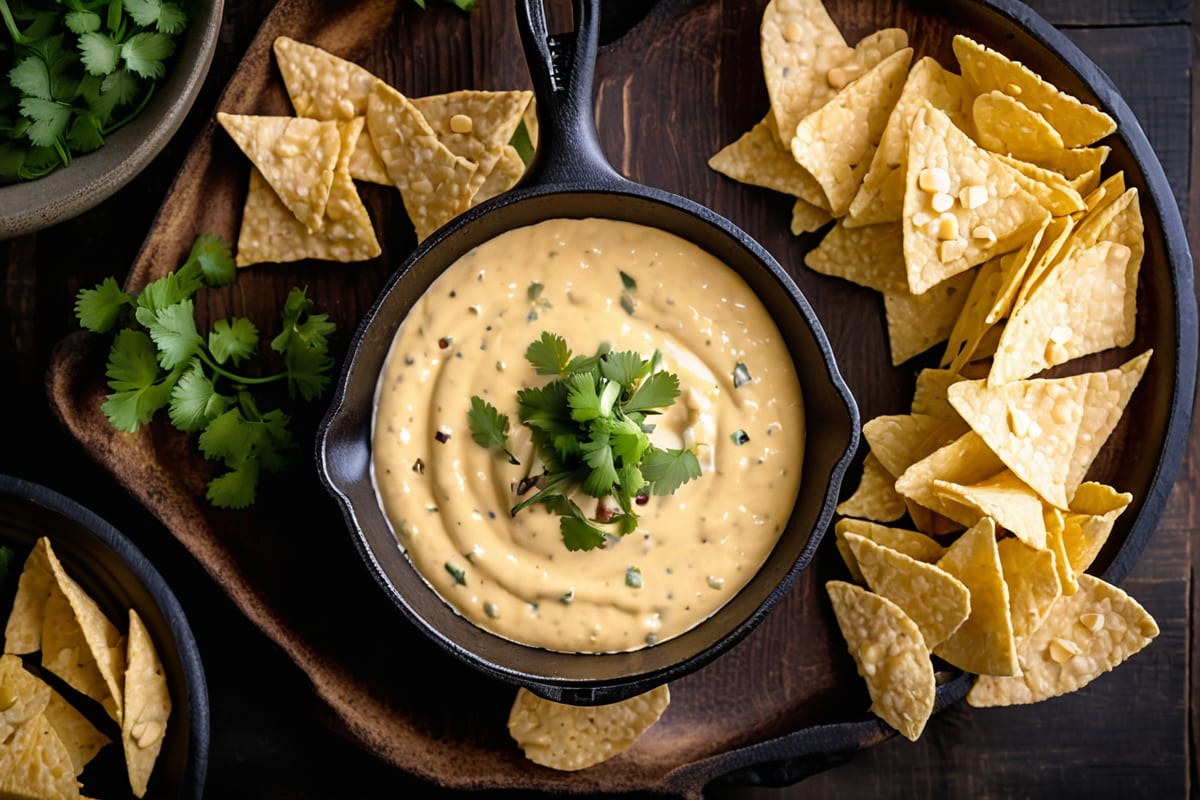
Gluten-Free · Dairy-Free · Snack  By SavoryFolks May 17, 2026
4.9
By SavoryFolks May 17, 2026
4.9
Dairy Free Queso — Creamy, Smoky, and Ready in 20 Minutes
This dairy free queso is silky, smoky, and seriously dippable. Made with cashews and roasted peppers, no one will miss the cheese.
Hey folks, this dairy free queso is the recipe I get asked about more than almost anything else I make. I brought it to a Super Bowl party two years ago, didn’t say a word about it being dairy-free, and watched an entire bowl disappear in under fifteen minutes. Someone asked me for the brand of Velveeta I used. I consider that the highest compliment this recipe has ever received.
The base is soaked raw cashews blended until completely smooth with roasted red pepper, green chiles, and a stack of spices that do a lot of heavy lifting. What comes out of that blender is genuinely silky — not grainy, not thin, not weirdly beige — and when you warm it gently on the stove it thickens into something that coats a chip exactly the way queso is supposed to. This dairy free queso has become a permanent fixture in my apartment from October through the NFL playoffs, and honestly throughout the rest of the year too because it takes twenty minutes and I always have cashews in the pantry.
If you’re new to cashew-based dips, welcome. You’re going to wonder where this has been your whole life.
Why It Works
The magic here comes down to three things working together: fat, acid, and heat.
Raw cashews are remarkably high in monounsaturated fat — according to USDA FoodData a one-ounce serving contains about 12 grams of total fat, the majority of which is oleic acid, the same fat that makes olive oil feel luxurious. When you soak cashews and then blend them with liquid, that fat emulsifies into an incredibly smooth, creamy paste that mimics the mouthfeel of melted cheese better than almost any other plant-based ingredient. It’s not a coincidence that cashews are the go-to base for virtually every serious dairy-free cheese sauce — they genuinely earn it.
Nutritional yeast brings the savory, umami-forward flavor that cheese usually provides. It’s not going to taste identical to cheddar, and I’m not going to promise you that it will. What it does is add depth and that slightly funky, satisfying note that stops cashew dips from tasting flat or one-dimensional. Three tablespoons is the sweet spot here — enough to matter, not so much that it becomes the only flavor you can taste.
The acid component — lime juice and a splash of apple cider vinegar — does something really important. Dairy cheese has natural lactic acid that gives it a bright, sharp edge. Without some acid in your dairy free queso, the whole thing can taste a little heavy and muted. The lime and vinegar wake everything up and make the other flavors pop. Don’t skip them, and don’t reduce them.
Roasted red pepper is doing double duty as both flavor and color. It’s the reason this queso looks like actual queso — warm orange, slightly golden — instead of pale beige. It also adds a subtle sweetness that balances the smoky paprika and the heat from the cayenne.
Finally, warming the blended mixture on the stove is non-negotiable. Cold cashew dip tastes fine. Warm cashew dip tastes like queso. The heat activates the spices, thickens the sauce to the perfect consistency, and creates that bubbling-skillet presentation that makes everyone at the table lean in.
Ingredients
Here’s everything you need for this dairy free queso, with a few notes on why each ingredient matters.
Raw cashews — They must be raw, not roasted. Roasted cashews have a stronger flavor that competes with the other ingredients and they also don’t blend as smoothly. Buy the whole cashews rather than pieces if you can; they tend to be fresher since they move faster off the shelf.
Soaking the cashews — Two hours in cold water is ideal. If you forgot to soak (it happens to everyone), a 15-minute boil in a pot of water works nearly as well. What you’re doing is softening the cashews so your blender can fully break them down. If your blender is a high-powered model like a Vitamix, you can sometimes get away with just 30 minutes of soaking, but more time is always better.
Nutritional yeast — This is sold in the bulk or health food section of most grocery stores, and also at Whole Foods, Sprouts, and online. It has a flaky, yellow appearance and a savory, slightly cheesy smell. If it’s your first time buying it, get a larger bag — you’ll use it constantly once you start making dairy-free cooking a habit.
Roasted red peppers — The jarred kind in water or brine works great here and saves time. Make sure to drain them well before adding them to the blender or your queso will end up too thin.
Smoked paprika — Regular paprika is fine in a pinch but smoked paprika is what gives this dip that subtle depth, like it’s been sitting next to a campfire. It’s one of my most-used spices and I genuinely think it’s worth keeping a separate jar of the smoked variety.
Green chiles — Use the small canned diced green chiles (Hatch or Ortega are both good). They add mild heat and a roasted vegetal flavor that plays perfectly with the other spices. If you want more heat, add jalapeño or bump up the cayenne.
Instructions
-
Soak your cashews — Place raw cashews in a bowl, cover with cold water by at least an inch, and soak for 2 hours at room temperature. If you’re in a hurry, place cashews in a small saucepan, cover with water, bring to a boil, and cook for 15 minutes. Either way, drain and rinse well before using.
-
Load the blender — Add the drained cashews, ¾ cup water, drained green chiles, roasted red pepper, nutritional yeast, garlic powder, onion powder, smoked paprika, cumin, lime juice, apple cider vinegar, and sea salt to a high-powered blender.
-
Blend until completely smooth — Start on low and work up to high speed. Blend for a full 2 minutes, stopping once to scrape down the sides. The mixture should be completely smooth with no cashew graininess at all. If it looks too thick to blend properly, add water one tablespoon at a time. Do not under-blend — this is where most people rush and end up with a slightly gritty result.
-
Taste and adjust — Before you heat anything, taste the blended mixture and adjust. More salt? More lime? More cayenne if you want heat? Get it right at this stage because the flavors will concentrate slightly as it heats.
-
Warm on the stove — Pour the blended mixture into a small saucepan over medium-low heat. Stir constantly with a spatula or whisk. The queso will thicken noticeably as it heats — this takes about 5 to 7 minutes. You’re looking for it to bubble gently at the edges and coat the back of a spoon. Do not walk away and do not crank the heat; cashew-based sauces can scorch on the bottom if you rush them.
-
Adjust consistency — Once hot, if the queso seems thicker than you want, stir in water a tablespoon at a time until it reaches a dippable, pourable consistency. It will thicken more as it sits, so err on the slightly thinner side if you’re serving it over a long stretch of time.
-
Finish and serve — Transfer to a warm serving bowl or a small cast iron skillet. Drizzle with olive oil, pile on your toppings — pickled jalapeños, fresh cilantro, a few dashes of your favorite hot sauce — and serve immediately with tortilla chips, warm corn tortillas, or raw vegetables.
Tips & Substitutions
Blender quality matters more than you’d think. A high-powered blender like a Vitamix or Blendtec will give you a noticeably smoother result than a standard blender. If you have a standard blender, soak your cashews longer — a full 4 hours if possible — and blend for at least 3 minutes. You can also strain the blended mixture through a fine mesh sieve to catch any remaining graininess.
Don’t skip the acid. I mentioned this in Why It Works, but it’s worth repeating because people are tempted to leave out the vinegar if they don’t have it on hand. The lime juice alone isn’t quite enough. The apple cider vinegar adds a slightly different acidity that rounds everything out. White wine vinegar or a tiny splash of regular white vinegar works as a substitute.
Making it ahead. This dairy free queso actually stores and reheats beautifully, which makes it one of my favorite things to prep for parties. Make the full batch, let it cool, and store it in an airtight container in the refrigerator for up to 5 days. Reheat gently in a saucepan over low heat, whisking in a splash of water to bring it back to the right consistency.
Freezing. Yes, you can freeze it. Pour cooled queso into a freezer-safe container and freeze for up to 2 months. Thaw overnight in the refrigerator and reheat as above. The texture after freezing is slightly less silky but still completely good, especially if you blend it again briefly after thawing.
Spice level. As written, this is a mild-to-medium heat level. For more heat: add a full teaspoon of cayenne, blend in a fresh jalapeño or two (seeds included), or stir in a spoonful of your favorite hot sauce at the end. For very mild: leave out the cayenne entirely and use mild green chiles.
Adding protein. Stir in a can of rinsed black beans and some frozen corn after warming for a heartier dip that works as almost a full meal over rice. This is one of my go-to weeknight shortcuts and it pairs perfectly with our black bean taco bowls.
Sunflower seed swap. If cashews are off the table due to a tree nut allergy, raw sunflower seeds make a decent substitute. The flavor is slightly more earthy and the color will be a bit different, but the technique is exactly the same. Soak, blend, heat.
Serving beyond chips. Use this dairy free queso as a sauce over baked potatoes, as a base for nachos, drizzled over roasted broccoli or cauliflower, or spooned into breakfast burritos. It also works incredibly well poured over our loaded dairy free nachos if you want to build a full spread.
Frequently Asked Questions
Can I make this dairy free queso without a high-powered blender?
Yes, but you need to be patient with it. Soak your cashews for at least 4 hours, ideally overnight, to get them as soft as possible. Blend in a standard blender for a full 3 to 4 minutes, stopping every minute to scrape down the sides and let the motor rest. The result won’t be quite as silky as a Vitamix version, but it will still be very good. Some people also have success blending standard cashew dips in a food processor, though blenders generally give better results for liquid-heavy mixtures.
Why is my queso grainy?
Almost always this comes down to one of two things: the cashews weren’t soaked long enough, or the blending time was too short. The fix is to blend longer — seriously, keep going past the point where it looks done. If it’s already made and grainy, you can pour the warm queso into the blender and run it again on high for another full minute. That usually rescues it. Going forward, an overnight soak in the refrigerator produces the smoothest result of all.
Is this dairy free queso also gluten-free?
Every ingredient in this recipe as written is naturally gluten-free. Cashews, nutritional yeast, roasted red peppers, canned green chiles, and the spices are all gluten-free. That said, always check labels on your individual products, especially nutritional yeast and canned chiles, since manufacturing facilities vary. If you’re serving someone with a serious sensitivity, look for products with dedicated gluten-free certifications on the label.
How do I keep it warm during a party?
A small slow cooker or mini Crock-Pot on the warm setting is ideal — it keeps the queso at the perfect dipping temperature for hours without scorching. Just stir it every 30 minutes or so and add a splash of water if it starts to thicken too much. A fondue pot works well too. If you don’t have either of those, serve it in a cast iron skillet set over a trivet and reheat on the stove every 20 to 30 minutes as needed.
Can I use roasted cashews instead of raw?
Technically yes, but I genuinely recommend against it for this particular recipe. Roasted cashews — especially salted ones — introduce a flavor that competes with the spice blend and changes the overall character of the queso. If raw cashews are completely unavailable and roasted are your only option, rinse them thoroughly, reduce the salt in the recipe, and expect a slightly nuttier, less neutral flavor in the finished dip. It’ll still be good, just different.
The Bottom Line
This dairy free queso is one of those recipes that earns its place in your regular rotation not because it’s a clever workaround or a “pretty good considering” situation — it earns it because it’s just genuinely delicious. 🧀✨
Twenty minutes, one blender, and a handful of pantry staples. The cashew base gives you real creaminess, the roasted red pepper gives you that warm golden color, and the spice stack gives you a dip that tastes like it belongs on a Tex-Mex restaurant table. Warm it, top it with pickled jalapeños and a little cilantro, and set it down in front of people without explanation.
The key things to remember: soak your cashews properly, blend longer than you think you need to, don’t skip the acid, and always warm it before serving. Do those four things and this will come out exactly right every single time.
Make it for your next gathering, your next movie night, or honestly just your next Tuesday when you want something a little better than whatever’s in the pantry. And if someone asks you what brand of cheese you used, just smile. 🌶️
Per serving
Nutrition facts, the honest kind
Calculated from the exact ingredients we tested with. Estimates — your numbers will vary slightly based on brand and portion size.
- Calculated per serving (6 servings total)
- Includes all components as written
- No specialty-ingredient guesswork
Nutrition Facts
6 servings per recipe
Calories 210 kcal
% Daily Value*
Total Fat 15g
Total Carbohydrate 14g
Dietary Fiber 2g
Protein 6g
* Percent Daily Values are based on a 2,000 calorie diet. Estimated values; your numbers may vary.
More from the kitchen
All recipes